Creating Beauty

As a child, I was frightened by a humongous Kissy doll. At 3, it was as big as I was and when you pulled it's hands together it made a smacking or a supposed kissing sound. I was sure it would get up and get me......making smacking sounds as it neared my bed.

Now I make dolls.....some are supposed to be scary, but most just reflect how I look at beauty. To me we have a very narrow view of what beauty is and is not. I have cerebral palsy and don't think I'm whining about it I'm not. I'm lucky my case is very mild compared to some people's. But you can pick me out as different, I walk awkwardly, but my arm and leg work correctly.....for someone with a partially paralyzed arm and leg.

I look like someone with CP is supposed to and in my way I'm attractive. I try to reflect alternative beauty in the dolls I create and so in some ways I'm still dealing with fear, but now it's not my own.

Tuesday, November 26, 2013

Works in progress- Water Dragons


Limited Edition Water Dragon Works in Progress Part 1

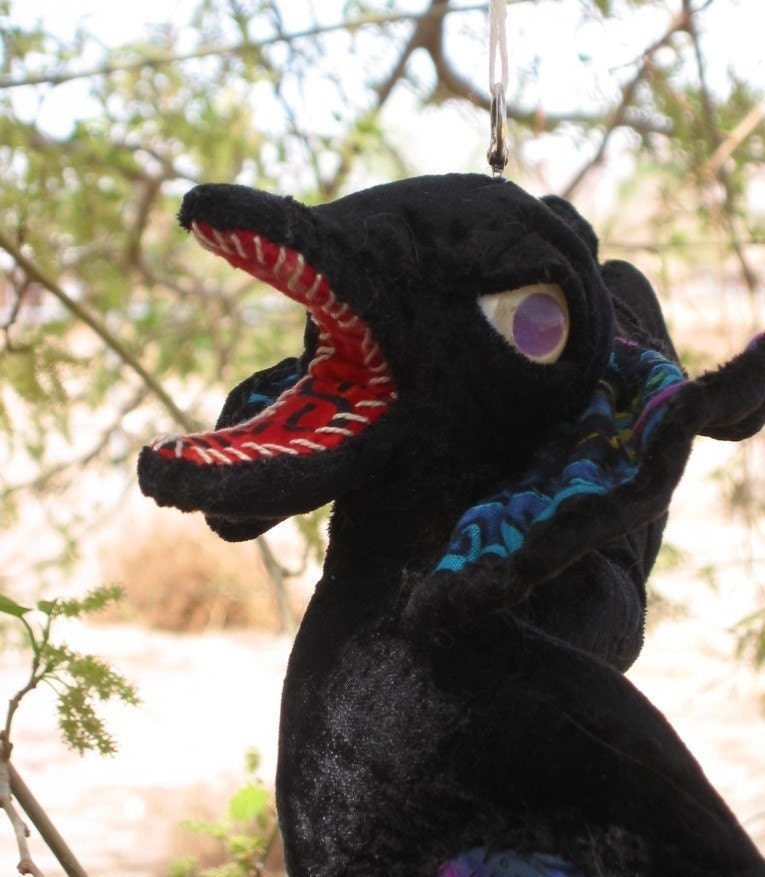
In my Pet Shop Of the Old Ones soft sculpture line I have a Water Dragon named Siku.
I've been thinking that making hybrid soft and hard sculpt figures in limited editions could lower the cost of some of my pieces. I'm hoping that this will make them more appealing to more customers.

I haven't done much clay sculpture in the past few years so this piece has been a challenge. The head, wings and torso will be cast in resin and hand painted. I plan on inserting an armature in the bottom of the torso and using batting and fabric embellished with beads to create the tail.

I'm looking forward to combining paint, fabric and beads to create these new pieces.


I'm working with an oil based clay called Chevant. It's used in the special effects industry, car and industrial design. It comes in several hardnesses and holds textures and details beautifully. It also smells and feels unpleasant if you love real clay or wax like I do. But I'm getting used to it... I think it might grow on me eventually.

I'm thinking of doing these animals in small editions of 12 to 25 at the most. I was also thinking it might be a fun kit sort of project too.

Friday, November 15, 2013

Ultraman Ultra Strange


As a kid, I used to watch Ultraman regularly. My husband did too. Recently we got the DVDs of the show. I never realized how many strange things went on in that show.

What was up with those tiny shorts that all the little boys wore?
Why did the Science Patrol sleep in their cheesy orange uniforms?
Why didn't the Beta Capsule that turned Hiata into Ultraman, come with a clip so he could attach it to his belt? He was forever losing that damn thing.

And where the heck did Ultraman put the beta capsule when he was trouncing the poor alien of the week? Did it become the Ultra butt plug? I mean look at his Ultra suit in this video http://www.youtube.com/watch?v=GD4q7KFEp6k
Can you see a pocket?

The Aliens and Monsters - I always felt bad for these guys. Ultraman tore them to bits most of the time. I liked the Toho(movie studio that did the Godzilla etc films) solution to monsters... they got captured and put on a nice island. They even had their own medical staff to look after them.


I watched one episode this weekend where the Science Patrol had a memorial service for all the defeated monsters... it was nice, but a far cry from a private island. As an adult, Ultraman makes me sad now, but I still like all the old Toho movies. They seemed to have more respect for their monsters.

Wednesday, November 13, 2013

I knew it! I did I really did!

 This quiz confirmed it for me! I always knew that I was different...heck look at the stuff I create. The Were You Abducted By Aliens Quiz  is fun. The link is at the bottom of this post. Let us know if you are in this select group.

Actually, I took the test and it said there was a 32% chance that I had been abducted at sometime in my past. It also said that if the aliens were to come back that I'd be one of the first picked up.

I was sure I was an alien when I was little. I have cerebral palsy and have limited use of my right hand and leg. I knew I was different, but my parents never really explained in detail what was wrong with me. So in my little 5 yr old way, I was left wondering about myself.
I've always known that I was adopted and I always thought it was cool. If I got teased about it at school, I always said..."My parents picked me over everyone else. Your parents got stuck with you!"

One of the things my Dad and I did every Saturday was watch The Three Stooges and Warner Bros.

cartoons together. This is how I found the answer to "Why am I different? problem. The cartoon ROCKET BYE BABY came on and there was Mot the little Martian baby who accidentally got switched with a human baby when Earth and Mars rotated very close one night. I mean it was so obvious to me then! I was a displaced Martian baby!

I was so happy with my new found identity and waited and waited and waited to turn green and grow a pair of cute little antenna.

YEAH, I know that it was not to be, but being me on a bad day leaves me feeling pretty alien still, but not in a good way. When I'm creating though, I'm Mott and the world is good.

Tuesday, November 12, 2013

Sewing Freeform Figures - Captured


The way I work can seem very involved. In this tutorial, I wanted
to share how I
made one of my favorite pieces, CAPTURED .


I've always loved the colors of the Egyptian Funerary Art and the textures and spiraling shapes in Gustave Klimt's work.

I've always done
sketches to
help me
plan my
sculptures,
but I have never let the drawings get too involved though. The fabrics and the sewing itself often dictated changes in the finished piece.

After I collected up different shades and textures of fabrics in the the Egyptian inspired colors , I chose the wires I wanted to use for the armatures.

I wanted the starfish to act as a base and it needed to hold the mermaid securely. Even though it was only 8 inches in diameter, I chose 14g galvanized steel wire for the basic framework because it was stiff enough to hold the shape I wanted. After making the basic shape, I wrapped the 14g with 22g wire.

This texturing of the armature made it easier to cover the wires with acrylic yarn. I used a buttonhole stitch for this step. The yarn covering made it easier to attach the strips of batting used to plump up the starfish's shape.

The mermaid may have been a smaller piece, but her construction was much more involved. The process was basically the same as the starfish, but I worked in layers on this figure. After setting up the armature, I covered her with batting and started sewing fabric on the tail.

Once I had a stable fabric base I used more pieces of batting to create breasts and the facial structure . More fabric was then whip stitched over top. On the head, the eyes were sewn on and the forehead, nose and chin were then shaped and sewn down.

On the torso, the breasts were formed by sewing batting around a marble and sewing it in place. Once they were covered with fabric, I continued the spiraling fabric shapes I started on the tail up the torso and over the breasts.

The final steps on the starfish were to secure the resin eye in
place, sew on an eyelid and embellish the entire surface with beads.

The mermaid's finishing touches were beading the hair and embellishing the torso with seed beads. Elastic trim was used to bind the mermaid in place.


Friday, November 8, 2013

Resin Eye Tutorial


                   My husband makes a lot of the eyes I use in my dolls and jewelry.....here is how he makes them.


First you'll need a silicone mold of a sphere the size you want your

eye to
be. It needs to be a one piece mold thats open at the back.


Get some Devcon Clear Two Component Epoxy from your hardware store. Also

get some dry tempera paints.


First, mix up a small amount of epoxy and use the black tempra paint to

make it black. VERY CAREFULLY, using a toothpick or some similar tool,
collect a
blob of the black epoxy on the end of the toothpick and carry it to the
mold.Let a pupil sized drop fall right into the middle of the spherical
mold. Don't let it hit the side of the inside of the mold and run down to the very
bottom, you must hit the center/bottom of the mold on the first try. You are
creating the pupil of the eye, and it must be perfectly round!


As this sets up, mix a larger batch of epoxy and tint it the color that

you wish the iris of your eye to be. Using the toothpick again, or better
yet a cheap disposable paintbrush, collect a dollop of the iris colored epoxy
and drop it into the mold right on top of the black pupil that you have just
created.
Of course, the iris color should flow beyond the area of the pupil.
Again, hit the center/bottom of the spherical mold the first time! to get a perfectly
round iris.


While this epoxy is setting up, mix a larger again batch of epoxy and

tint it a cream or white color. This will be the white of your eye. Mix
enough to pretty much fill the rest of the mold. Pour it into the mold and it's
best to let the whole thing set overnight. The following day, de mold the eye
and see how it looks. If you are happy with it, and since most dolls, figures have
TWO eyes, you now get to make a second eye just exactly like the first! Good
Luck! Once you have your TWO eyes, I would lightly sand them both to get rid of
any textures that may have formed on the surface of the eyes. Once they
have been sanded evenly, coat them both with an un tinted coat of epoxy to give
them a wet look. Sometimes a second or even third coat of clear epoxy is needed to
get a uniform coating.


This is a really down and dirty way to make fake eyes.Your biggest

hurdle will be to get some molding silicone to ccreate your spherical mold.
You'll also need a sphere to mold. A Ping Pong ball, large marble, etc.


Locate Burman Industries on the internet to purchase silicone molding materials, and

information on working with it.


Good luck! Be forewarned -This takes a great deal of practice, silicone for the molds is expensive and expect a high failure rate while you are learning.

Friday, November 1, 2013

OOooh! I love that masked Man! My Fixation with Masked or Disfigured men


When I was a little girl, all the little boys wanted to be Speed Racer. Me.... I wanted to marry Racer X.

I mean really... a brave man who saves the day....is tall and mysterious...what could be better?

My fascination with the idea of the masked or disfigured man was continued when I started reading the comic strip Brenda Starr. Basil St. John always showed at the right time to save Brenda.

As Vincent Parry in Dark Passage, Bogart spends a good part of the movie with his face covered in bandages. He has his face altered so he can find who really killed his wife. ( And having Agnes Moorehead as his nemesis doesn't hurt this movie either.)


Henri de Toulouse Lautrec... well, he was talented, disabled and successful. What could be better?
I know from experience that being physically different makes me stronger and more unique. I can ....with effort survive just about anything. I like my fantasy and real men to be strong, brave survivors.
I guess I grew up to see the different and the mysterious as the spice of life.